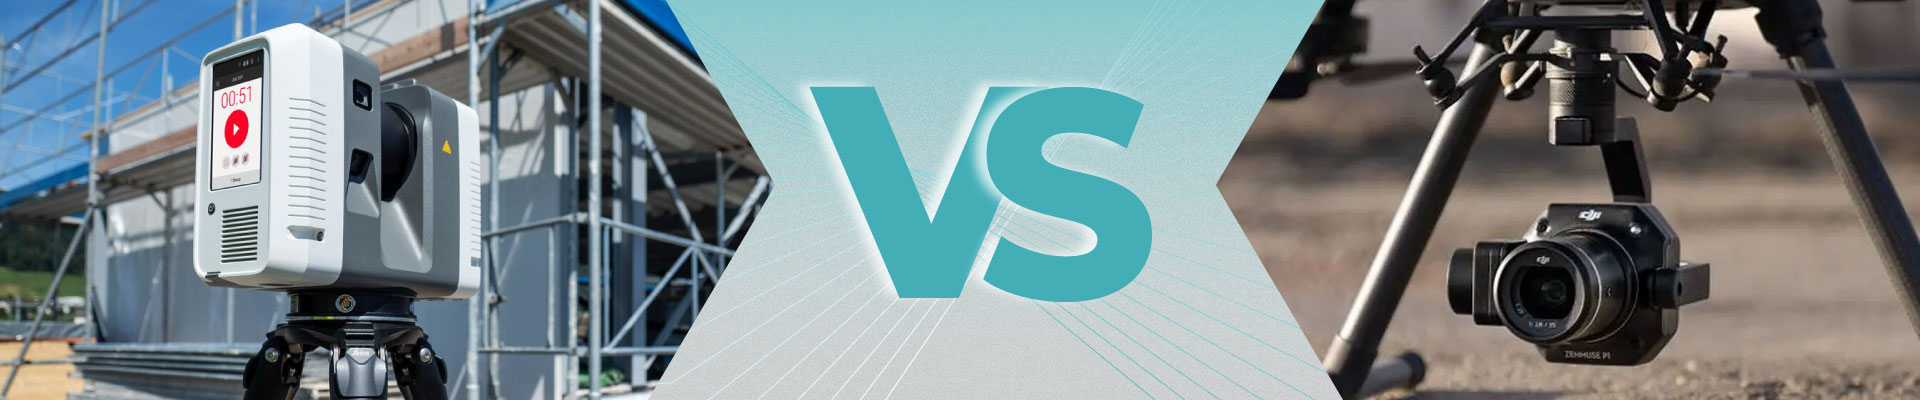
Laser Scanning vs. Photogrammetry: Choosing the Right Approach for Your BIM Project
Kseniya Kutsenko
14.02.25
Introduction
Have you ever stepped into an old warehouse or historic building and thought, “How on earth do we capture every beam for a digital model?” That’s where Scan to BIM comes into play—turning real-world structures into precise 3D representations. Two of the most popular ways to gather that crucial data are laser scanning and photogrammetry.
But which method works best for you? In this article, we’ll explore laser scanning vs. photogrammetry from a real-world perspective. If you’re about to embark on a building restoration or plan an upgrade and need an accurate model to avoid costly rework, this guide will help you make a confident choice.
| Short on time? Jump straight to the Comparison to see a quick side-by-side rundown.
1. Understanding Laser Scanning
1.1 Why Laser Scanning Matters
Picture this: you’re managing a large-scale renovation of a busy commercial space. Workers are bustling around, and deadlines feel closer than they are. You need a fast, precise snapshot of the environment—every wall, beam, and detail. Enter laser scanning.
Laser scanning (often called LiDAR) shoots out rapid pulses of light to measure distances from the scanner to the surrounding surfaces. In doing so, it captures millions of individual measurements (known as a point cloud). The end result? A detailed 3D dataset, perfect for as-built documentation.
Key Takeaways:
-
Speed & Detail: Modern scanners can quickly gather tons of data—great when time is tight.
-
Minimal Guesswork: If accuracy is a top priority, laser scanning usually leads the pack.
1.2 How the Process Unfolds
-
Scanner Setup: You don't need to place the scanner in any strategic spot. Do, for example, 5 scans at different points in 10 minutes.
-
Rapid Data Capture: The device sends out laser pulses in a 360° sweep, measuring what bounces back.
-
Registration: Multiple scans (from various positions) merge into one coherent coordinate system.
-
Post-Processing: Clean up the data, then import it into your BIM software (e.g., Revit) to build a rich 3D model.
1.3 Benefits of Laser Scanning
-
Accurate: Ideal for projects that require tight tolerances—like retrofits or delicate structural changes.
-
Time-Saver: Collecting millions of points per second can significantly cut fieldwork.
-
Comprehensive Views: When done correctly, your entire space is captured, leaving less room for surprises later.
1.4 Possible Drawbacks
-
High Equipment Cost: Professional laser scanners can be pricey (though renting is an option).
-
Line-of-Sight Challenges: You may need multiple scanner setups to cover blind spots.
-
Heavy Data: Dense point clouds can be large, requiring good hardware and know-how.
2. Understanding Photogrammetry
2.1 A More Visual Approach
If you’ve used your smartphone to create a 3D model of your living room (just for fun, perhaps), you’re already dabbling in photogrammetry. This technique reconstructs 3D shapes by analyzing overlapping photographs—finding shared reference points in images taken from different angles.
Photogrammetry can be budget-friendly, since you often just need a high-resolution camera or a drone. And if you love aesthetically pleasing, photorealistic outputs, this method can deliver some stunning visuals.
2.2 How It Works
-
Photo Shoot: Snap overlapping images around your subject—imagine walking in a circle around a statue, taking shots at every step.
-
Software Magic: A specialized program (e.g., Agisoft Metashape) looks for common points in these photos, then triangulates their positions in 3D space.
-
Output Creation: The software generates either a point cloud or a textured 3D mesh that you can import into Revit or similar platforms.
2.3 Perks of Photogrammetry
-
Lower Cost Barrier: Cameras and drones are often cheaper than high-end laser scanners.
-
Great Visuals: Useful if you need photorealistic textures—for instance, to showcase a historic façade.
-
Versatile Reach: Drones can capture roofs and taller structures without extra scaffolding.
2.4 Watch-Outs
-
Accuracy Fluctuations: Photogrammetry’s precision depends heavily on lighting, camera quality, and technique.
-
Processing Overhead: Converting hundreds (or even thousands) of images into a 3D model can push your computer to its limits.
-
Environmental Sensitivity: Dimly lit spaces or reflective surfaces can lead to muddy data.
3. Real-World Applications: Scan to BIM
Whether you opt for laser scanning or photogrammetry, the end goal is usually the same: a reliable 3D representation for your Scan to BIM workflow.
Common Scenarios Include:
-
Renovations & Retrofits: If you’re restoring a historic building or overhauling a warehouse, having an accurate model helps reduce on-site surprises.
-
Existing Condition Audits: Building owners can plan maintenance or safety upgrades with real measurements in hand.
-
Design Validation: Instead of guesswork, architects and engineers can virtually walk through as-built models to spot issues early.
Internal Link: Ready to bring your space into the digital realm? Check out our dedicated Scan to BIM Services page for more details.
4. Laser vs. Photogrammetry: The Key Differences
4.1 Level of Accuracy
-
Laser Scanning: Known for millimeter precision - especially handy where any mismatch could lead to project delays.
-
Photogrammetry: Often “close enough” for many projects. With the right skills and conditions, it can rival laser scanning, but it’s not always a sure bet.
Real Talk: If you can’t afford even small errors (imagine fitting custom windows), go laser. If you have a bit more leeway, photogrammetry can be a great option.
4.2 Budget Implications
-
Laser Scanning: Typically involves higher equipment or rental costs. Yet, its speed and accuracy might actually save money in large-scale or complex projects.
-
Photogrammetry: Cameras and drones are friendlier on the wallet, but factor in software licenses and the time spent processing large batches of photos.
Pro Tip: Sometimes splitting the project—laser scan for critical interior details, photogrammetry for broad exteriors—makes both your accountant and your site manager happy.
4.3 Field Speed & Workflow
-
Laser Scanning: Each scan covers a large area quickly. You do, however, need multiple setups if obstacles are blocking the scanner’s line of sight.
-
Photogrammetry: Taking pictures can be a breeze (especially with a drone), but data processing might be lengthy.
Scenario: For tall exteriors, photogrammetry + a drone can capture data in a snap. For cramped mechanical rooms with complex piping, laser scanning often wins.
4.4 Data Volume & Handling
-
Laser Scanning: Expect massive point clouds—sometimes hundreds of millions of points. That’s a lot to store and process.
-
Photogrammetry: You’ll have loads of images to manage, then a resultant 3D model or point cloud. The ultimate file size depends on your chosen detail level.
Heads Up: Ensure your workstation can handle these workloads. High-res scans or thousands of photos will quickly gobble up storage and GPU/CPU resources.
4.5 Environmental Considerations
-
Laser Scanning: Works in low-light conditions, though reflective or transparent materials may cause “noise.”
-
Photogrammetry: Needs decent lighting and enough visual details or texture. Overexposed or monotonous surfaces (like white walls) can be problematic.
In Practice: If you’re scanning a partially lit basement with metal pipes, laser scanning might be more straightforward. Photogrammetry thrives in well-lit, diverse environments.
5. Practical Tips for a Smooth Project
5.1 Align Your Goals
-
Accuracy vs. Budget: If you’re designing a meticulously fitted interior, prioritize laser scanning. If you need a general sense of layout—say, for marketing visuals—photogrammetry might suffice.
5.2 Don’t Shy Away from Hybrid Solutions
Consider capturing critical areas (like structural columns or intricate details) via laser scanning, then using photogrammetry for simpler sections or external facades. Merging datasets in a BIM software can give you the best of both worlds.
5.3 Master the Setup
-
Laser Scanners: Follow manufacturer guidelines for calibration. Use targets for more precise registration.
-
Cameras/Drones: Keep your shots consistent. Avoid shaky hands or aggressive drone maneuvers that blur images.
5.4 Plan Data Management Early
-
Storage: Both methods can produce large files. Make sure you have robust backup solutions.
-
Processing Muscle: If your computer is already gasping for air running basic CAD, consider a hardware upgrade or cloud-based processing services.
-
Version Control: Keep track of file versions and unify naming conventions. Trust us—it’s easier than searching for “Final-Final_2” in a crisis.
5.5 Get Skilled Operators or Partners
Even the best gear won’t help if your team lacks experience. Invest in training or consider hiring specialists to handle the data capture and post-processing.
6. Frequently Asked Questions (FAQ)
Is photogrammetry precise enough for professional Scan to BIM?
It can be, especially for less intricate projects or external surveys. With a good camera and methodical approach, photogrammetry can rival laser scanning’s accuracy, but typically laser remains the gold standard for precise needs.
Which method is more time-efficient?
Laser scanning is often faster on-site. Photogrammetry is quick if you need to get a cloud of a larger area object, for example a section of a road or a village. It’s usually project-specific—some sites favor one method over the other.
Can I blend both in a single BIM model?
Yes! Combining a laser-scanned interior with a photogrammetry-based exterior is common.
How do I import these into Revit?
Both produce point clouds or meshes. Revit supports point cloud imports directly (RCP or RCS files for laser scans), and third-party tools can convert photogrammetry outputs to Revit-compatible formats.
Any tips for scanning reflective materials?
Laser scanning can get “noisy” with mirrors or metal. Photogrammetry also struggles if surfaces reflect too much light. Try dulling reflective surfaces or adjusting angles to capture more consistent data.
Conclusion
In the end, your choice between laser scanning and photogrammetry boils down to your project’s unique demands: Do you need fine precision and have the budget for it? Or are you capturing a broader scope, where there's no need for a high-level detalization? It’s not a one-size-fits-all scenario. Many professionals mix both methods for a well-rounded result—laser scanning for meticulous accuracy, photogrammetry for cost-effective coverage.
Whichever path you choose, remember that Scan to BIM is about more than just technology. It’s about solving real problems—like avoiding renovation delays or confidently presenting owners with reliable data. Make sure you plan carefully, invest in the right gear or partner, and always keep the end goal in mind: a digital model that mirrors real-world conditions as closely as possible.
Curious about how we can help transform your building into a precise 3D model? Visit our Scan to BIM Services page to see how we collect and process data for reliable, human-first results. Got a unique project in mind? Contact us to explore tailored solutions!
Share:


SOCIAL MEDIA


© Copyright BIMPROVE company LLC. All rights reserved 2026. Privacy Policy.